

Build and edit forms
Use the form builder to change what a form asks, add your own forms and consents, and publish them so staff can send them.
Who can do this: Owners and Office Managers. Other staff can see the Forms page but can’t change it.
Go to Settings → Patients and AI → Forms. The page is headed Forms & Consents. Patient forms must be turned on for your practice first. See Patient forms and form bundles.
Add a form to your list
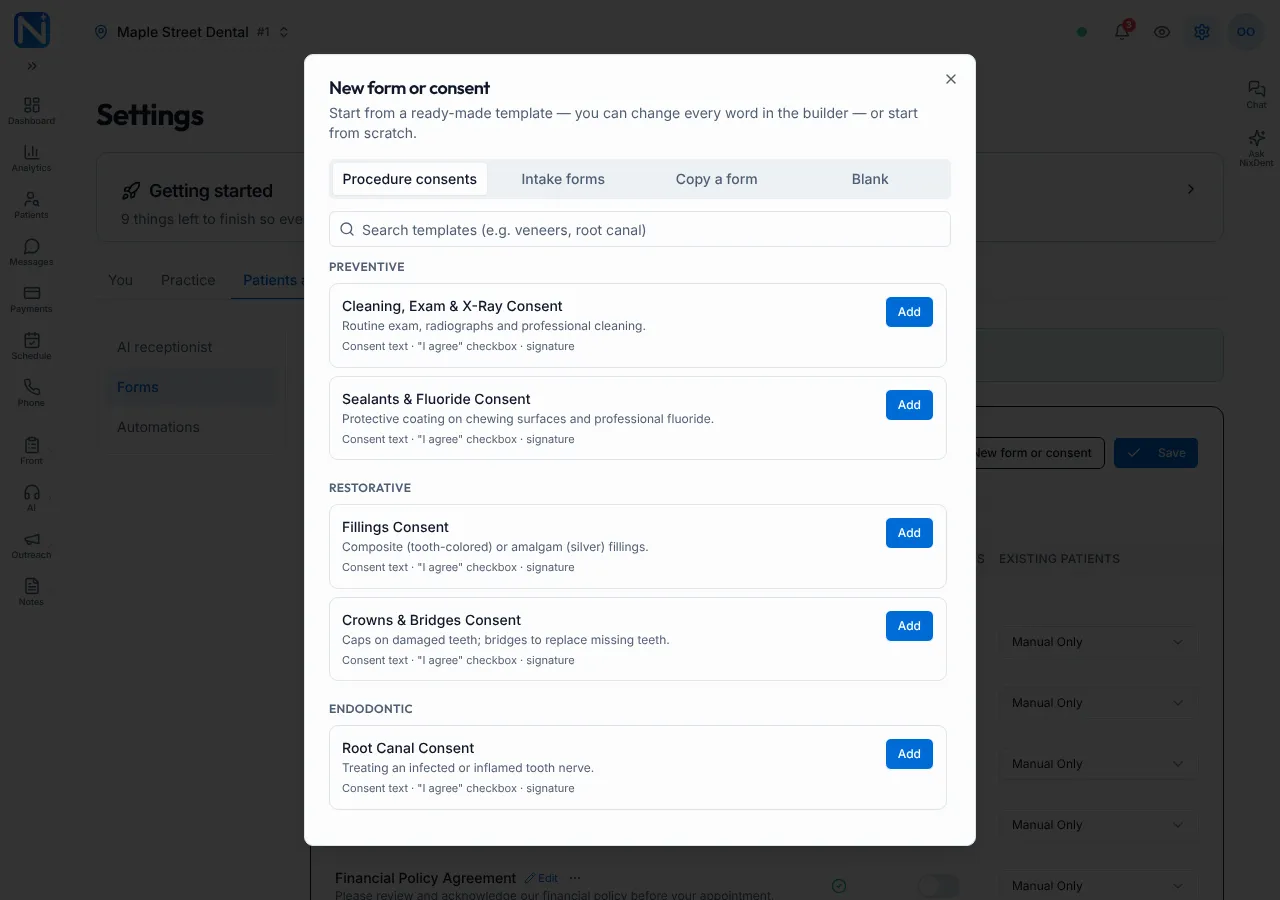
Section titled “Add a form to your list”- Click New form or consent. A window opens with four tabs.
- Choose a tab:
- Procedure consents: ready-made consents for specific treatments, grouped by Preventive, Restorative, Endodontic, Periodontal, Oral Surgery, Implants, Orthodontic, Sedation & Anesthesia, Pediatric and General. Use the search box (“Search templates (e.g. veneers, root canal)”). The wording is a general starting point, not legal advice. Have it reviewed for your state.
- Intake forms: registration, history, insurance, authorizations, policies and screening questionnaires. Examples: Contact Details Update, Dental Insurance Information, Medical Insurance Information, Text Message (SMS) Consent, HIPAA Authorization to Release Information, Release of Dental Records, Guardian Authorization for a Minor, Office Policies, Comfort Menu, Gum Disease Risk Assessment, Sleep Screening Questionnaire, Infant Oral Health Assessment.
- Copy a form: make a separate copy of one of your own forms, for example a Spanish version.
- Blank: type a Form name (for example “Sleep Apnea Screening”) and start from nothing.
- Click Add next to a template. Once added, the button changes to Added · Open.
The new form appears in the list on the Forms page.
Manage the list
Section titled “Manage the list”Each row on the Forms page shows the form name, whether it is Active, and two settings:
- New Patients switch: whether the form is part of the new-patient flow.
- Existing Patients: Manual Only, Show (Optional) or Required When Due.
Click Save at the top when you change those settings. Activate, Deactivate and Make a copy act at once.
The ⋮ menu next to a form has:
- Make a copy
- Restore latest template: replaces your version with NixDent’s current wording and discards your edits. Forms patients already submitted aren’t affected. Use Make a copy first if you want to keep your edits. This is only offered for forms that started from a NixDent template.
- Activate or Deactivate: an inactive form can’t be sent. It is marked Inactive.
Open the builder
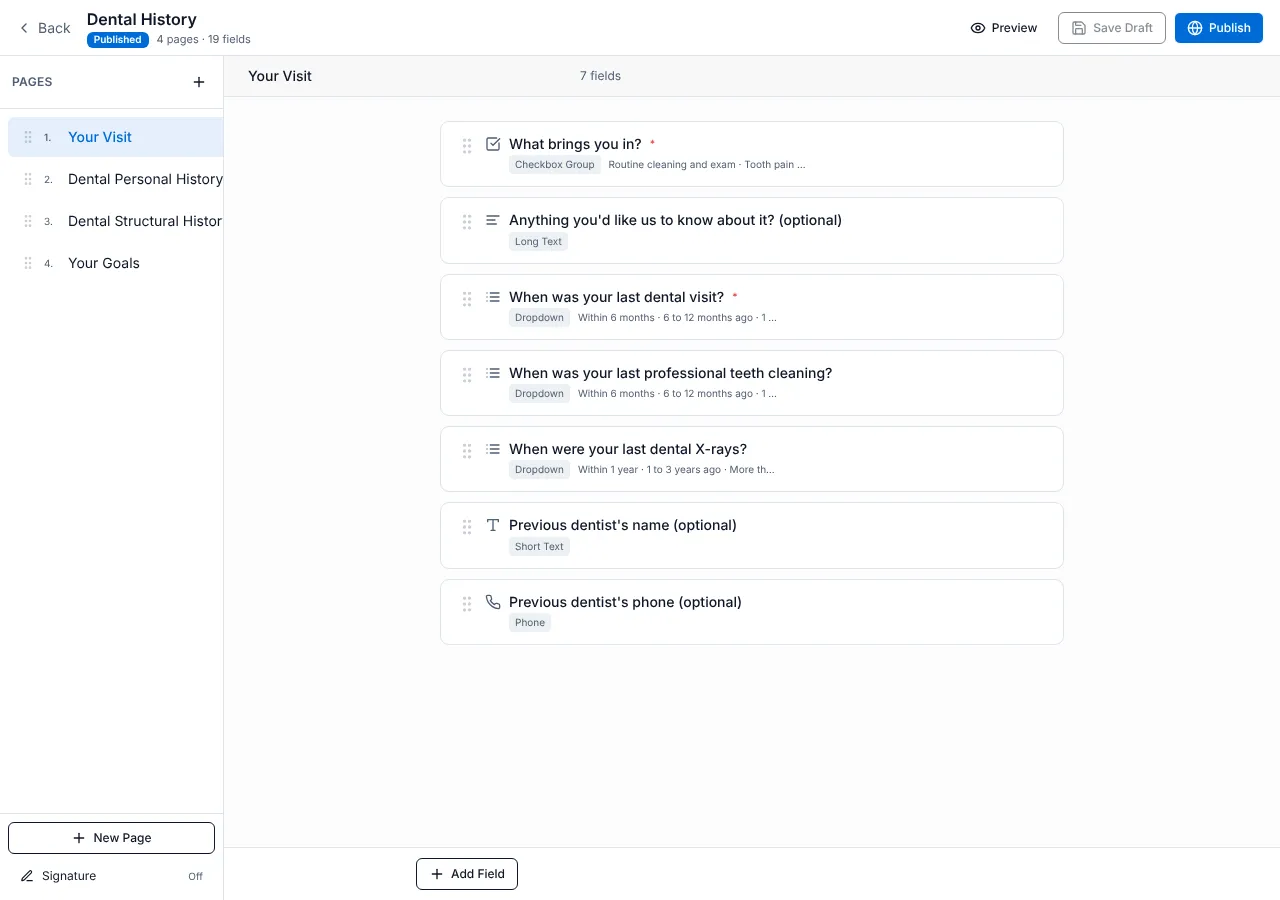
Section titled “Open the builder”Click Edit next to a form. The builder has three areas:
- Left: Pages. Click New Page to add one, click a page to open it, or delete one. A page is one screen of the form for the patient.
- Middle: the page’s fields. Click a field to edit it.
- Top: a Back button, the form title, a Draft or Published badge with a count such as “4 pages · 19 fields”, Preview, Save Draft and Publish. “Unsaved” shows when you have changes you haven’t saved.
Add and change fields
Section titled “Add and change fields”Click Add Field and choose a type:
| Group | Field types |
|---|---|
| Basic | Short Text, Long Text, Date, Phone, Email, Social Security Number |
| Choice | Dropdown, Multiple Choice, Single Checkbox, Checkbox Group, Yes / No Questions |
| Special | Signature, File Upload |
| Layout | Section Header, Paragraph / Consent |
Click a field to change it. Depending on the type you can set the Field Label, Placeholder (optional), Help Text (optional), the Options, and Required.
- File Upload has Accepted File Types and a Use as patient photo switch, which makes the upload the patient’s profile photo.
- Paragraph / Consent holds the text. Switch on Terms require approval and type the Checkbox text (for example “I have read and agree to the terms above.”) to make the patient tick a box.
- Yes / No Questions is a group of questions with an optional Group heading. Each question has an optional hint, and can have a follow-up (a text box or a list of options) when the patient answers Yes. Use Move question up and Move question down to reorder, or paste a list with One question per line.
Drag a field by its handle to reorder it.
Ask for a signature
Section titled “Ask for a signature”In the left-hand list, below the pages, click Signature (it shows On or Off). Switch on Patient signs at the end to show a statement and a signature box after the last page. The form can’t be submitted unsigned. Type your own Signature statement, or leave it to use the default.
You can also add a Signature field inside the form where a signature belongs.
Fill in names automatically
Section titled “Fill in names automatically”In a label, help text, consent paragraph, checkbox text or the signature statement, use the + Insert placeholder menu to insert details that fill in when the patient opens the form: Patient first name, Patient last name, Patient full name, Patient date of birth; Practice name, Practice phone, Practice address, Practice email, Office / location name; Doctor; Today’s date. Patient details fill in only after the patient has confirmed who they are. Until then, a blank line shows.
Preview, save and publish
Section titled “Preview, save and publish”- Click Preview to see the form the way a patient will.
- Click Save Draft to keep your work and come back later.
- Click Publish when it’s ready. A message says Form Published: The form is now live and can be sent to patients. You return to the Forms page.
- Click Back at any time. If you have unsaved changes, a window titled Unsaved Changes asks “Leave without saving?”
Forms patients have already submitted aren’t changed by later edits. A patient who has already opened a link keeps seeing the version they opened. An edit made before they first open the link does show.
What patients see
Section titled “What patients see”See What your patient sees when they fill in a form.
Send completed forms to Open Dental
Section titled “Send completed forms to Open Dental”At the bottom of the Forms page, Send completed forms to Open Dental controls what happens to the answers. For each office choose After staff review or Automatically, and decide whether medical history is also added to the patient’s Problems, Medications and Allergies lists. Name and date of birth are never changed. Phone and email are only filled in when the chart has none. Every import can be undone. If an office says “Not turned on for this office yet”, contact NixDent.
Common problems
Section titled “Common problems”I can’t find the Edit button. You need the Owner or Office Manager role. Others can view but not change forms.
Patients can’t see my new form. Check it is Published and Active, and that it is enabled where you want it (New Patients switch or Existing Patients rule). Forms are sent from the patient’s ⋮ menu in Patients → Send Form.
I broke a NixDent form. Open the ⋮ menu → Restore latest template.