

Send a treatment plan to the kiosk
Who can do this: Owners, Office Managers, Front Desk, Back Office and Doctors. The Prepare & Send button is hidden for roles that can’t present treatment plans.
Open a patient’s card and go to the Tx tab. Setting up the iPad is covered in Set up an iPad kiosk.
What the patient sees
Section titled “What the patient sees”When you send a treatment plan, the kiosk opens it in a locked page. The patient confirms their date of birth, reads, and signs on the screen. When they finish, the kiosk goes back to its waiting screen.
Send a treatment plan to the kiosk
Section titled “Send a treatment plan to the kiosk”- Open the patient’s card (click their name anywhere in NixDent) and go to the Tx tab. Each saved treatment plan from Open Dental has a Prepare & Send button.
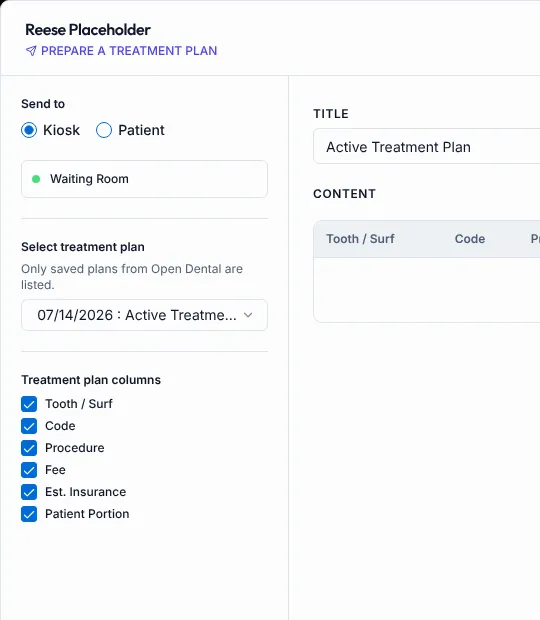
- A full-screen window titled Prepare a treatment plan opens. Under Send to, choose Kiosk. Kiosk is selected first.
- Pick the kiosk from the list. A green dot means it’s online. A kiosk that’s offline is greyed out with “Offline” and can’t be chosen. If the list says No kiosks connected, check that the iPad is open and on Wi-Fi.
- Check the plan under Select treatment plan and tick the columns you want the patient to see (Tooth / Surf, Code, Procedure, Fee, Est. Insurance, Patient Portion).
- Click Send & Close (or Just Send). The plan appears on that iPad. Print prints it instead.
Common problems
Section titled “Common problems”No kiosk appears in the list. The iPad is offline or not set up. See Set up an iPad kiosk.
The patient can’t continue after a send. The patient must enter their date of birth. If they’re stuck, take the iPad back and send again, or give the plan on paper.
The iPad is showing the wrong screen. Remove the kiosk and add it again.
What to do next
Section titled “What to do next”- Check the kiosk shows Online at the start of each day.